The Network Administration Tool
1. Introduction
* Network Administration Tool Manual
The Network Administration Tool allows you to specify the way your system connects to other computers and to internet.
2. You can start Network Administration Tool in the following ways:
Applications menu
Choose System Tools ▸ Networking.
Command line
Execute the following command: network-admin
When you start Network Administration Tool, you will be prompted for the administrator password, this is necessary because the changes done with this tool will affect the whole system.
After entering the administrator password, the following window is displayed.
Figure 1 Network Administration Tool main window
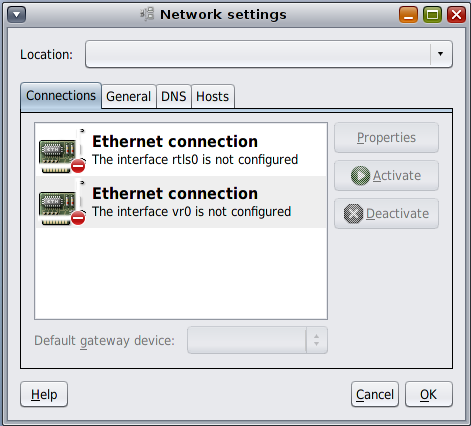
The Network Administration Tool main window contains four tabbed sections:
Connections
Shows all the configured network interfaces, it also allows you to modify their settings and to add or delete interfaces
General
Shows your system host name and domain, it also shows the way your system identifies itself in Windows networks.
DNS
Contains two sections, the DNS servers are what your computer use for resolving the IP addresses from the domain names. The search domains are the domains in which your system will search any host when any domain is specified.
Hosts
Shows the list of aliases for accessing other computers.
3.1. To create a new interface
In the Connections section, press the Add button, depending on the interface type, you will need to provide different data:
Ethernet and IRLAN interfaces
You can specify if you want to configure automatically the interface through DHCP or BOOTP, or if you want to configure it manually providing its IP address, netmask and gateway.
Wireless interfaces
You can specify if you want to configure automatically the interface through DHCP or BOOTP, or if you want to configure it manually providing its IP address, netmask and gateway. You also need to specify the network name (ESSID).
Parallel line interfaces
You have to specify the IP address that the interface will have, and the IP address of the system to which it will be connected. You can also specify that you want the remote host to be the default gateway.
PPP/Modem interfaces
You have to specify the phone number, username and password (this data is provided by the ISP), the modem device will be autodetected.
3.2. To modify an already existing interface
In the Connections section, select the interface you want to modify and press the Properties button, depending on the interface type you will be able to modify different data.
Ethernet and IRLAN interfaces
You can modify the way the interface is configured (DHCP, BOOTP or manually), if the interface is configured manually, you can also modify the interface IP address, netmask and gateway.
Wireless interfaces
You can modify the way the interface is configured (DHCP, BOOTP or manually), if the interface is configured manually, you can also modify the interface IP address, netmask and gateway, you can also modify the network name (ESSID) for this interface.
Parallel line interfaces
You can modify the interface IP address, as well as the remote IP address.
PPP/Modem interfaces
You can modify the modem device, whether you want it to dial using tones or pulses, the modem volume, the phone number, the username and password that your ISP provided and other advanced settings for PPP.
3.3. To delete an interface
In the Connections section, select the interface you want to delete and press the Delete button.
3.4. To activate or deactivate an interface
In the Connections section, select the interface and press the Activate or Deactivate button.
3.5. To change your host name and domain name
In the General section, change the hostname or domain name text boxes.
3.6. To change the way your system identifies itself in Windows networks
In the General section, change the description or workgroup of your system in Windows networks. You can also specify the WINS server if you need one.
3.7. To add a new domain name server
In the DNS section, type the new DNS IP address in the DNS text box and press the Add button.
3.8. To delete a domain name server
In the DNS section, select a DNS IP address from the list and press the Delete button.
3.9. To add a new search domain
In the DNS section, type the new domain in the search domain text box and press the Add button.
3.10. To delete a search domain
In the DNS section, select a search domain from the list and press the Delete button.
3.11. To add a new host alias
In the Hosts section, type a new IP address and the aliases that will point to it and press the Add button.
3.12. To modify a host alias
In the Hosts section, select an alias from the list and modify the aliases in the text box.
3.13. To delete a host alias
In the Hosts section, select an alias from the list and press the Delete button.
3.14. To create a new profile
Press the Network profiles button, a new window will appear letting you to save your current configuration as a profile pressing the Save current button. You must specify a name for the profile, optionally you can specify a description for this profile.
3.15. To delete an already existing profile
Press the Network profiles button, in the network profiles window, select the profile you want to delete and press the Delete button.
3.16. To switch the current profile
Change the current network profile menu, all the configuration will be switched automatically to the chosen profile.
